When you purchase through links on our site, we may earn a commission. Here’s how it works.
SimpliSafe’s Smart Lock syncs with their home security system. But unlike most home security components that you can easily install via a peel-and-stick adhesive, the smart lock takes some extra work. But don’t worry; it’s easier than you might think, and once you’re done you’ll be left with slick smart lock known for its keyless design and voice controls. Our experts take you through the installation process step-by-step, with a video for our visual learners.
How Easy Is Installation?
From our experience, installation takes about 10 minutes and is not all too difficult. If you’re experiencing trouble with a particular step, don’t hesitate to ask our experts and readers for help in the comments. And, of course, SimpliSafe is always a phone call away (phone support hours are 9 am – midnight ET).
Step-By-Step Visual Guide
We take you through the installation process step-by-step.
- Prepare Existing Deadbolt
- Remove Existing Thumbturn
- Remove Mounting Plate From Lock
- Install Mounting Plate
- Choose Adapter
- Prepare Thumbturn
- Install Lock
- Secure Lock
- Test Lock
- Install PIN Pad
- Activate Lock
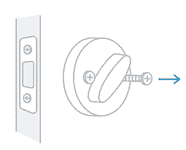
1) Prepare Existing Deadbolt

On the outside of your door, secure the deadbolt in place with the included tape. DO NOT remove the outdoor portion of your deadbolt.
2) Remove Your Existing Thumbturn
On the inside of your door, unscrew your deadbolt’s thumbturn. Hold the screws for step 4.
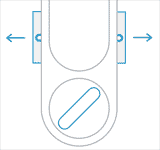
3) Remove Mounting Plate From Lock
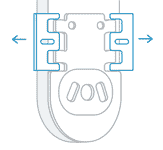
You must remove the mounting plate (which comes pre-installed on your Smart Lock) before proceeding. To remove, slide out the wing latches located on the back of the lock. Then remove the mounting plate.
4) Install Lock Mounting Plate
Note which face of the mounting plate should be toward the door. Then center the mounting plate on the thumbturn connector.
Use your existing deadbolt’s screws to install it on your door, and make sure it’s secure.
Don’t Get Screwed Over…
Don’t overtighten screws, as it could bend your mounting plate.
If the screws are too thin to hold the plate, use the included washers.
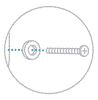
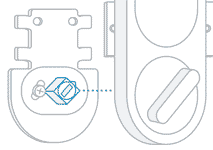
5) Choose The Adapter That Fits Your Tailpiece
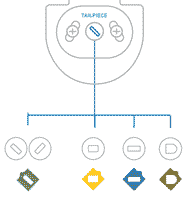
The adapter you choose should correspond to the shape of the existing tailpiece to your door. Slide it over the tailpipe through the mounting plate.
If your door’s tailpiece is diagonal, use the green adapter. Vertical or horizontal tailpieces will need the other three adapters. The notch at the top of the adapter should aim up and away from your doorway.
6) Prepare Thumbturn
Make sure your door is unlocked (turn the thumbturn to the unlocked position). Then check that the locks’ wing latches are out.
7) Install The Lock
Slide the SimpliSafe Smart Lock over the adapter, slowly turning the thumbturn until the device aligns with the adapter and slides fully against the mounting plate.
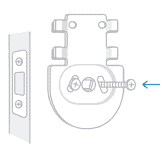
8) Secure The Lock
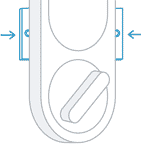
Secure the lock by sliding the wing latches inward onto the mounting plate.

If you see a gap or can’t attach your lock, your mounting plate might be bent. Try loosening the screws on the plate and re-attaching the lock.
9) Try Unlocking And Locking
Manually turn the thumbturn on the lock to test locking and unlocking your door.

If you have trouble, use the included tool as a lever to slide the wing latches outward and remove your lock. Make sure you’re able to unlock the lock and deadbolt using the adapter, then try repositioning your lock.
10) Install The PIN Pad
Use the double-sided adhesive to mount the PIN Pad to the outside of your door or just off to the side. Make sure you leave at least a 3-inch space below the PIN Pad so you can access the batteries.

For a more permanent attachment, use the included screws. To access the screw holes, use the included tool to remove the back of the PIN Pad, and then screw the back to the door and reattach the PIN Pad.
11) Activate The Lock Using Your SimpliSafe System’s Keypad
Bring your Keypad over to the door to make things easier and browse to Menu > Devices > Add Device > Lock, and then follow the instructions. Note – we are referring to the keypad here, not the base station.
If you don’t see the Lock listed under “Add Device,” check for Keypad updates by going to Menu > System Settings > Check For Updates.
If you’d like more detail on these steps, SimpliSafe has published a smart lock installation guide. And if you’re still stuck, visit SimpliSafe to chat with support (phone support hours are 9 am – midnight ET).
SimpliSafe Door Lock Installation Video
If you’re more of a visual learner, we’ve got you covered as well. Check out this video by SimpliSafe enthusiast Juan Camacho that runs you through the installation process.
SimpliSafe Door Lock FAQs
Here are frequently asked questions from our readers. Don’t see yours? Ask us in the comments!
Will Simplisafe Door Lock Work Without Wi-Fi?
Yes it will! This is one of the large advantages of the SimpliSafe smart lock vs those of competitors’, which are typically tied into a security system that requires Wi-Fi for its components to work.
How Long Does Simplisafe Door Lock Battery Last?
SimpliSafe claims the battery life to last 8 – 12 months. In our experience, it lasted about 9 months. Factors that will decrease battery life include increased usage as well as whether the lock is installed in colder (lower than 40 degrees Fahrenheit) climates.
How Long Does Simplisafe Door Lock Pin Pad Battery Last?
The pin pad battery is a 3-volt battery, and will outlast the smart lock battery. The pin pad battery is expected to last 2-3 years. In our experience, we had to replace the battery right after the 2 year mark. Once again, increased usage and colder climates will reduce battery life.
What To Do If My Simplisafe Smart Lock Doesn’t Calibrate?
If your SimpliSafe smart lock refuses to calibrate, follow these five simple steps:
- Power on the lock and make sure the battery is charged and working by sliding the open the top cover, pressing the test button, and checking for blinking lights. A low battery is indicated by a slow blinking center light.
- Bring the keypad close to the Lock and browse to Menu > Devices > Lock > Recalibrate.
- When prompted by the keypad to “close your door,” turn the lock into a locked position, then press “done.” You should now notice the smart lock turning three times as it calibrates.
- If you hear “check your door, is it unlocked?” the calibration was successful.
- Assuming the door successfully unlocked, select “yes.” You should hear a “congratulations” message, after which you can select “ok.”
Your SimpliSafe smart lock is now calibrated. If anything didn’t work, let us know in the comments.
Who Makes The Best Security System?
We specialize in home security and conduct annual reviews of the top providers. How does SimpliSafe fare in our experts’ showdown? Find out in our home security systems reviews.
Got your SimpliSafe lock installed? Let us know how it went in the comments!